Sunday, January 29, 2012

DIY Toddler Snuggie from Womens Sweater

My Husband and I were given Snuggies for Christmas this year and when Eliza saw them she immediately wanted one (who wouldn't).  Instead of going out and spending $20 on something I knew she wouldn't wear very much I decided to venture into my own closet and make her one.  I have had this sweater for almost 10 years... 


Its super cute, but way too bulky.  So I set out to make it into a oh so cozy and cute Snuggie for Eliza. I started by putting the sweater on her and measuring how long the sleeves needed to be.  I wanted the sleeves to be a little short so she wouldn't get them in food and things.  After I measured I simply cut the sleeves off.


Next I cut the sweater so that it was open in the back.


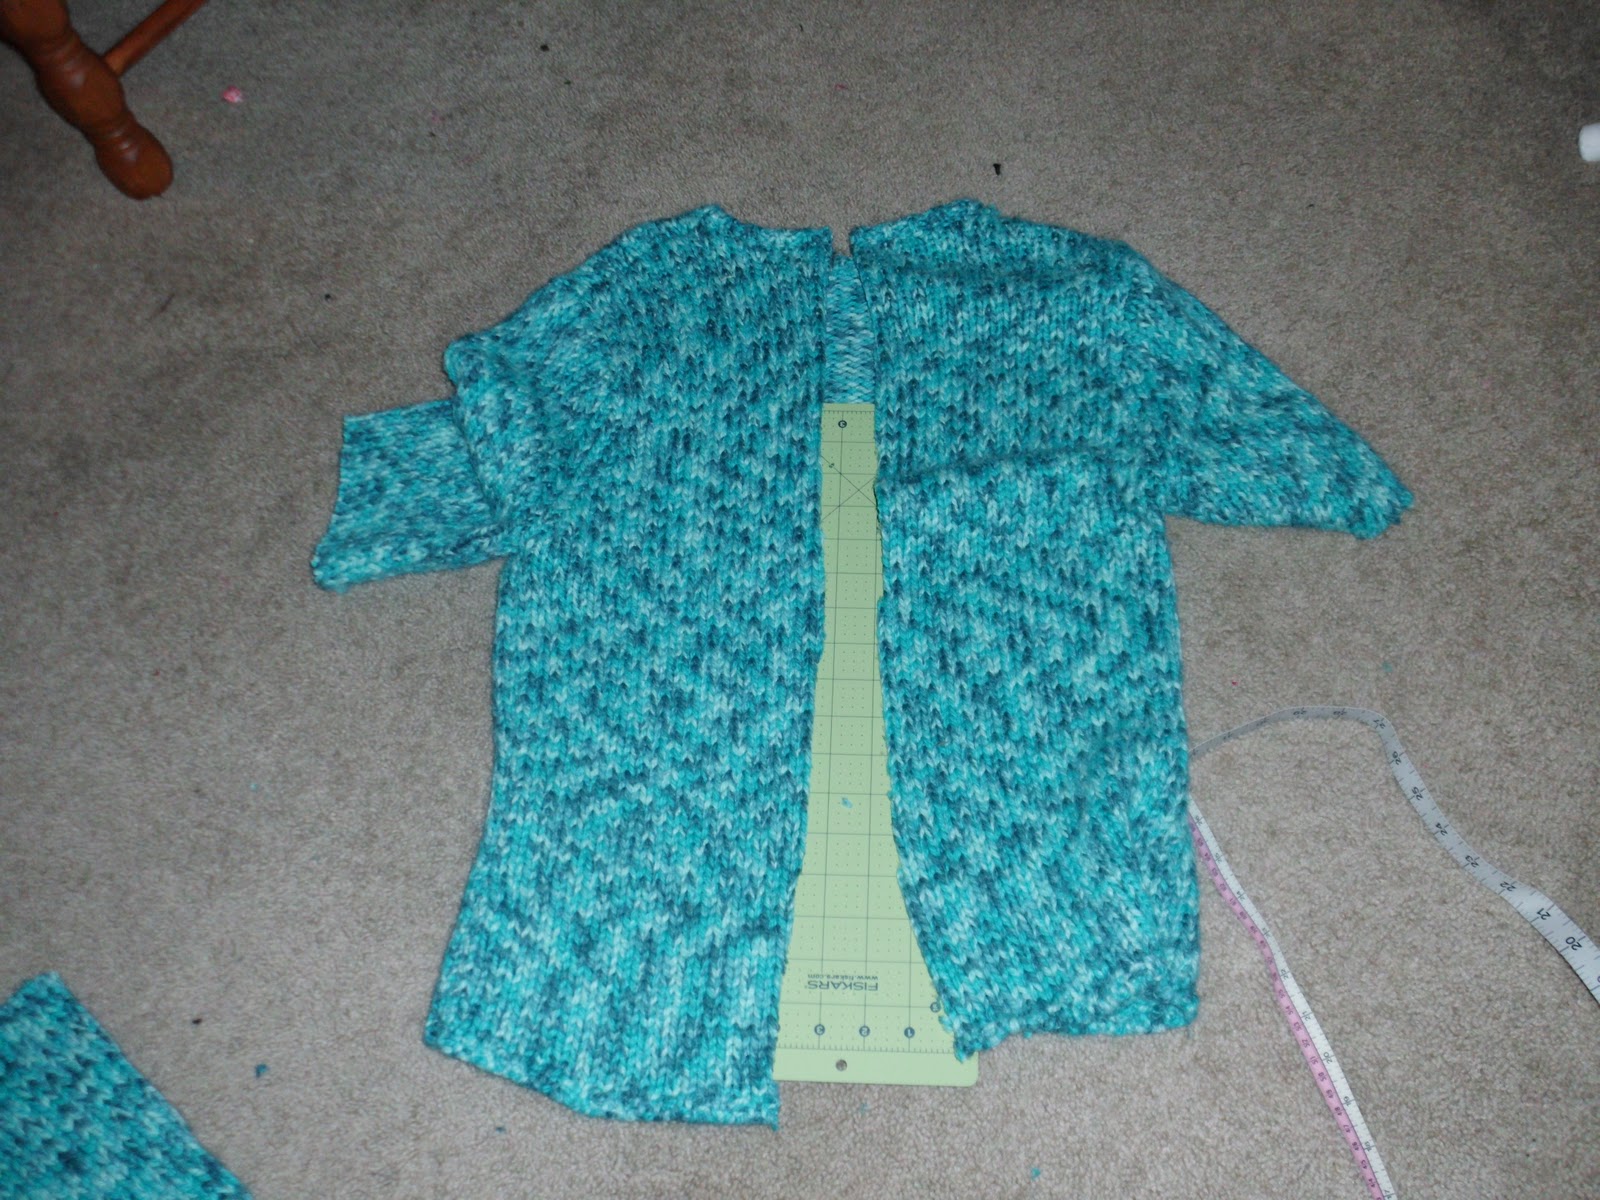
Then I cut about an inch off of either side of the back opening.


At this point your sweater will look something like this...


Now if the sweater is originally as long as you want it you can just skip the next step, but if it needs to be a little longer this next step is important. At this Now both sleeves open, I went along the seam of the sleeve.


Now hem the sleeves where you cut them (the sleeves still attached to the sweater) and the openings on the back of the sweater.  I used a zigzag stitch but you can use whatever works best for your type of sweater.


Depending on the length of your sweater you might have your finished product, however mine needed to be longer so I took the two sleeves that I cut in half earlier and I sewed them together to create one long piece.


Last I sewed this long piece to the bottom of the Snuggie.  BAM..Toddler Snuggie!


Eliza loves wearing this thing! It likes to hang open in the back, so I am going to go in and add a button to the back to keep it closed, but other than that it gets the job done.

Snuggie in ACTION:)


Please let me know if you have any questions, thanks for reading!


Thursday, November 24, 2011

ETSY COUPON CODE FOR FREE SHIPPING! BLACK FRIDAY ONLY

What would black Friday be without a free shipping coupon code for my Etsy store? Crap, it would be total crap.  So to make it totally awesome I will give you the top secret code...but remember it will expire at 12 am Friday night..or Saturday morning if your a cup half full kinda person...


HOLLABLACKFRIDAY1 (a.k.a the top secret coupon code)

coupon good starting 9 pm 11/24...so what are ya waiting for? 

If you haven't been to my shop yet there is a direct link to it at the top left hand corner of the page.  Happy Shopping!

Monday, November 21, 2011

Family Dinner and Movie Night at Home...way cheaper

We don't do this very much so when we do it feels like a real treat, not only for our daughter, but also for us big people too! I like to pick a movie (obviously a kids movie) and create a dinner or snack that has the same theme as the movie.  The great thing about this is you can do it with pretty much ANY movie that you already have.

Some Ideas with links to recipes:

 ~Princess and the Frog/Gumbo
http://www.food.com/recipe/quick-easy-chicken-sausage-gumbo-109348

~Coraline/Button Cookies
http://muishkasrecipebook.blogspot.com/2010/12/coraline-button-cookies.html

~Cloudy With a Chance of Meatballs/Spaghetti
http://allrecipes.com/recipe/easy-spaghetti-with-tomato-sauce/

~Curious George/Banana Bread
http://allrecipes.com/recipe/banana-banana-bread/

~Shreck/Waffles
http://allrecipes.com/recipe/waffles-i/

~Garfield/Lasagna
http://allrecipes.com/recipe/easy-lasagna-ii/

~Tangled/Angel Hair Pasta Chicken
http://allrecipes.com/Recipe/angel-hair-pasta-chicken/detail.aspx

~Kung Fu Panda/Steamed Dumplings with Dipping Sauce
http://thaifood.about.com/od/thairecipes/r/dumplingschicke.htm

~Chicken Run/Chicken Pot Pie
http://www.bettycrocker.com/recipes/easy-chicken-pot-pie/df0d82fa-a1de-4bc6-8952-a4a2533baf75

Howls Moving Castle/Bacon and Eggs
~I am going to assume everyone knows how to make this one ;p
 
First things first, you HAVE to turn the living room into a super awesome movie theatre unlike any other. Light a few candles, if you have a pull out sofa pull it out for once..make it cozy.  Have your kids grab all the biggest pillows and blankets in the house.  If you don't have a pull out sofa you can make a pallet on the floor..super fun too! 

Before you watch the movie have the kiddos help you make dinner/snack. This is great family time..the perfect way to start the night.

Now break all the rules..eat in the living room, in the dark while watching the movie.  Half way through the movie stop to take a potty break and make popcorn.  After this night of fun your wallets will be happy and so will your kiddos! 

Monday, November 7, 2011

Lost Camera!

Hello out there to my 4 followers! First thank you for following, second I am sorry I haven't posted anything in a while.  My camera is missing!! GASP...I am heart broken.  I have searched the house high and low and still have not been able to find it.  So my dreams of awesome blogs are put on hold for now I guess.  But I have discovered Pinterest..and I mush say I am super addicted. Since discovering Pinterst I have tested a few ideas and I am here to tell you how they work.

1.  Homemade Mod Podge (equal parts Elmer's glue and water)
  • This is basically a poor mans varnish..and lets face it these days who isn't poor? I tried this stuff out and it works great.  I used it to add some floral fabric to small table top in my bathroom and it looks super cute.  Too bad I can't take a pic to show you ;(
2. No Sew Scarf made from an old shirt  http://pinterest.com/pin/453620673/
  •  For this I used an old long sleeve knit fabric shirt.  It was super easy to do..and I even cut the arms off of the shirt to make super simple and cute footless boot socks, and then I cut out the hemmed neck of the shirt and used it as a tie on headband..no sewing!
3. Old baby gate turned into a message board.
  • For this you need to have one of the old cheap baby gates that are wooden.  I didn't actually get this idea from Pinterest, but by being addicted to Pinterest I was inspired to hang an old baby gate on the wall..you feel me?
  • To do this just decide where you want the gate to go, put a couple of nails in the wall, decide how long you want it to be..grab some clothes pins and pin your fav crap to it..easy as pie! (again I would love to show you a pic..hopefully I can either find or replace my camera in the near future)
Thanks again to anyone who reads my blog :) Hope this was helpful!

Friday, October 14, 2011

RECIPE: Homemade Low Calorie Pizza

So the hubby and I have been trying to find healthier options for the foods that we love, and our most recent craving was PIZZA! If you don't love pizza then you might just be a zombie @-@  So much guilt can come from filling your face with a super carbed up greasy pizza from the local joint.  So save yourself the guilt, the heartburn, and a little cash and try out my hubbies latest pizza recipe!!

This pizza serves 3, so if you are feeding more you will want to double the ingredients.  You will need the following ingredients:

  • 1 box of Jiffy Homemade Pizza Mix
  • 1 can of Pizza Sauce
  • 1 package of Hormel Pre-Cooked Chicken (or anything that you might have leftover that needs to be used up)
  • 1 package of fresh Mozzarella cheese
  • 1 package of fresh Spinach
  • 1 Tomato
  • 1 Green Pepper
  • 1 Red Onion
  • Fresh Garlic, minced
Start by cutting up and preparing all of your ingredients.  You want to have everything ready to smack onto your pizza. Be sure to cut the green peppers and onions pretty thin, unless you like crunchy things..then please make them as fat as you would like.

Next follow the instructions on the box for making your dough..it is super simple to do, the only hint I will give is that when your dough has finished setting for 5 minuets and you are getting ready to knead it, be sure you have floured your hands.  The dough will be super sticky at this point and you want to kind of use your floury hands to make it into a ball before you take it out of the bowl.

After your dough as baked in the oven for about 3 minuets it will be time to add your toppings..of course you want to start with the sauce..but after that it is up to you which order you would like your toppings.

Cook that sucker for like 18 minuets...until the cheese is all melty in the pan and your kitchen smells so good it makes you want to throw rocks at your Grandma...that's when you know its ready..mmmm..yum..


We also let Eliza make her own personal pan pizza using her favorite toppings (or I should say "topping" since it is only sausage) because there isn't a 4 year old out there who should be eating "healthy" pizza...I am not saying I encourage childhood obesity or anything..but let your kids live once in a while people!


For this pizza all we needed was an extra box of crust and some sausage, we used the Fresh Mozzarella for hers too and we used a small pie pan to make it "deep dish"...yummmm

Thursday, October 13, 2011

Girls Vest Tutorial

Turn a too small jacket...


Into a TOO CUTE VEST...


All you will need for this tutorial is...

  • A Jacket
  • Some Lace
  • Matching thread
  • Scissors
  • Pins
First start by cutting off the sleeves, be sure to leave at least 1/2 inch seam allowance on the sleeve.


Next turn the jacket inside out, fold the extra sleeve in and pin.


Before you start sewing be sure you are using thread that matches your vest.  Use a running stitch to sew a hem into your sleeves.


Cut off any extra material so that it does not show when you turn the jacket/vest right side out.  Your jacket/vest should look something like this..


Now it is time to add some lace! Pin your lace all the way around the zipper and hood part of your vest (I think it is safe to call it a vest at this point).  Be careful not to pin too close to the zipper or your needle will not glide smoothly.


Now sew the lace onto the vest.


I also add some lace to the pockets.  To do this cut two pieces of lace that are the same length as your pockets, pin and sew them to the outside of the pocket (careful not to sew the pocket together).
 
 
Now flip the lace into the pocket and sew over the same stitch that you just stitched.


Now your vest is complete!! What a great fall re-fashion :P


Wednesday, October 12, 2011

Preschool Geography ~Lesson One~


Up until now Eliza and I have mainly been working on letters, numbers, shapes, ya know, the basics.  So I decided that today was the day to branch out, to really start learning about the world.


I started by grabbing a few resources from the library, including:

  • The Children's Atlas of the World
  • The Giant Encyclopaedia of Theme Activities for Children 2 to 5
  • Vanishing Cultures Frozen Land (story)
  • A Day in the Life of Narwhals (story)
  • Animal Atlas Animal Passport (DVD)
  • Growing up Arctic (DVD)
We are really lucky to have a great library with lots of educational resources, but if you live somewhere that doesn't (or if you would rather not spend the gas money on getting to the library) you can always go online to find some really great materials.

Typically with my home preschool I like to keep it short and simple.  I find that the more you try to force learning the harder it can be for a toddler to absorb what you are trying to teach them, so my lesson plans are usually no longer than 30 minutes long, and they go something like this...

  • Song (right now we are doing a days of the week song)
  • Overview, talk about what they will be learning
  • Letter/Number/Word tracing
  • Fun Facts
  • Coloring Page
  • Activity
  • Story
Today I had the Atlas open to two pages depicting the North/South Poles and the animals who live there.


We had a lot of fun looking and talking about all of the animals, we even did a fun game I Spy ;p. Next I showed Eliza the coloring page that I drew up for her (please feel free to laugh at my drawing). We talked more about the North/South Poles in reference to where we live on the planet.  It was a "rough" drawing to say the least, but she got the idea.  If you would rather not draw up a coloring page, again you can find one online and print it out.


After finishing the coloring page we made Snowy Owls.  To make Snowy Owls you will need the following:

  • 1 paper plate per owl
  • Stapler
  • Scissors
  • 3 yellow/orange triangles (we used some old fleece fabric, you can use construction paper or you can just crayons)
  • Glue
  • 2 black buttons per owl (or again you can color them on)
Follow the  instructions to create your own Snowy Owl.  The pictures wouldn't line up exactly how I wanted, but you can see the instructions.  First you fold, then staple, cut the wings, add the fringe, last glue on the eyes, beak and ears.


Your owl should come out looking something like this...


After making our Snowy Owls we read the story about the Narwhals.  We plan on watching the Arctic DVD tonight after dinner.

That completes lesson one in Preschool Geography. Thanks for reading!